

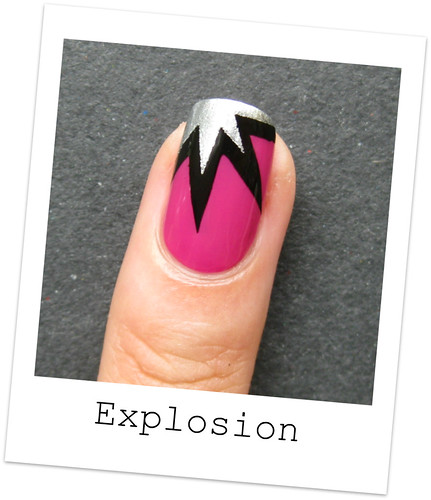
Hi everyone, welcome to my 'explosion' shape tutorial! The first time I used this design was in my 4th of July mani, representing fireworks. You loved it and requested a tutorial, so here it is :) The taping technique I use for it is similar to the zigzag pattern, so it's not very hard but it does require some patience because there are two taping sessions. So to make the time this design takes reasonable, I recommend using one-coaters or a fast drying topcoat. Let's get started!
 Start with the base color you like (if necessary with a basecoat underneath) and let it dry completely. To speed up the drying process you can apply a fast drying topcoat. The one I sometimes use is Seche Vite, which enables me to place the tape strips on my nails after about 10 minutes.
 Now cut some triangles out of tape to make the 'explosion' shape. The way I do it is by first cutting off a little piece of the tape roll which I then cut in half diagonally, like shown in the picture(s).
Of course you can do the cutting before step 1, I personally like to cut the strips while I let my base color dry. But I have to be careful then, otherwise the tape might get stuck to my nails and ruin the polish. So admittedly, it is safer to start with cutting before applying the base color. However, if you've learned how to cut the tape without having it touch your polished nails, it can save you a lot of time.
 Now place the triangles one by one, next to each other on one corner of the nail, in a slight curve. This will create the 'explosion' shape. It's your choice to make the shape at the cuticles or the tip, however my experience is that it's a lot easier near the tip, like shown in the picture. Because that way you're polishing away from the tape, reducing the chance of polish seeping underneath. Also you don't have to reckon with cuticles nearby.
Make sure all the pieces of tape are completely stuck to the nail, if not use your finger or a tweezer to push them down and if needed reattach them.
 Then apply your first layering color with a thin coat and carefully peel off the pieces of tape right away. Try to peel them off individually, if you can, because most of the time your design will come out neater this way.
Then let the design dry for a while, use a fast drying topcoat to quicken the drying if needed.
 When the polish is entirely dry, you can start the taping process once again with your second layering color. Only this time place the triangles a bit more towards the tip, covering up part of the first layering color like shown in the picture. Apply your second layering polish and remove the tape strips as soon as possible.
 At last apply your topcoat, clean up and you're done! Don't forget to moisterize your cuticles afterwards, because the tape can really dry out your skin!
Use this design for a full mani or cute accent nails. When you're going for a full mani, you can do the design on different spots on each nail for a playful look (example here.)
Finally some useful tips:
- For my tape manis, all I use is regular stationery tape. But you might prefer something else, so just experiment with different sorts of tape to figure out what works best for you.
- For your base color you can use any polish you like, however one-coaters will allow you to place the tape much sooner because those are usually fast drying. Of course you can also quicken the drying of polishes that require several coats to cover, by applying a fast drying topcoat. (I use Seche Vite).
- Your layering color(s) can be either a one- or two-coater. Because you've already applied a base color, most polishes that usually take two coats to cover now will do with one.
- Though I mention cutting the tape strips as step 2, I admit it is safer to cut before applying the base color. However, if you've learned how to cut the tape without having it touch your polished nails, it can save you a lot of time.
- You might want to leave the cut strips somewhere else than the edge of your desk/table, to prevent them from getting stuck to the surface while you're busy. You do not want to have to peel them off with your freshly painted claws!
- Apply your top color in one thin (but opaque) coat, this will create crisper lines.
- When you're removing the tape strips, try to remove them individually, if you can, because most of the time your design will come out neater this way
- Using tweezers to remove the tape strips can prevent your freshly painted nails from getting smudged.
- It's not always necessary to start all over if you've messed up your design, often a little touch-up with a nailart brush can solve the problem.
- If you want to use a matt topcoat, use a regular one underneath. My experience with matt topcoats is that they smudge the design very easily, even when it's completely dry. Applying a normal topcoat first will prevent that.
- Moisterize your cuticles afterwards, because the tape can really dry out your skin!
- You can practice this tutorial on your old mani that you applied a day (or more) before. If you succeed, you've got yourself a fresh mani, otherwise you were going to remove it anyway!
- If you feel like this design is too time-consuming for a full mani, you can also use it for an accent nail (or two).
- Have fun and practice makes perfect ;)
I would absolutely love to see your attempt on my design, so feel free to leave a link to your creation in the comment section!
Polishes I used in this post are OPI Dim Sum Plum, Color Club Where's The Soiree? and China Glaze Millenium.


0 comments:
Speak up your mind
Tell us what you're thinking... !