


Hi guys, it's time for another tutorial! This time I will show you how to make the lightning bolt French. The design is very simple to achieve and perfect for covering up extreme tipwear or VNL. What you need is just a bit of regular tape and a pretty, covering polish to match your base color. Let's get started!
 So start with the base color you like (if necessary with a basecoat underneath) and let it completely dry. This can be one that's yet to be applied or one you're already wearing.
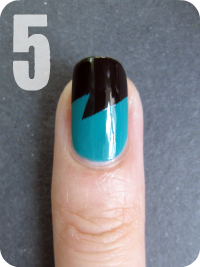
On the picture I'm wearing Ms Jagger Green from Pieces that I applied the day before I shot this picture, as you can see there's some VNL and a tiny bit of tipwear.

Place a strip diagonally on your nail and make sure the side that's closest to the polish-area is really stuck on the surface, meaning that that side of the strip should not be wrinkled.


At last apply your topcoat, clean up and you're done. Striking! :P
Finally some useful tips:
- For my tape manis, all I use is regular stationery tape. But you might prefer something else, so just experiment with different sorts of tape to figure out what works best for you.
- For your base color you can use any polish you like, however one-coaters will allow you to place the tape much sooner because those are usually fast drying. Of course you can also quicken the drying of polishes that require several coats to cover, by applying a fast drying topcoat. (I use Seche Vite).
- Your layering color(s) can be either a one- or two-coater. Because you've already applied a base color, most polishes that usually take two coats to cover now will do with one.
- Though I mention cutting the tape strips as step 2, I admit it is safer to cut before applying the base color. However, if you've learned how to cut the tape without having it touch your polished nails, it can save you a lot of time.
- You might want to leave the cut strips somewhere else than the edge of your desk/table, to prevent them from getting stuck to the surface while you're busy. You do not want to have to peel them off with your freshly painted claws!
- Apply your top color in one thin (but opaque) coat, this will create crisper lines.
- When you're removing the tape strips, try to remove them individually, if you can, because most of the time your design will come out neater this way
- Using tweezers to remove the tape strips can prevent your freshly painted nails from getting smudged.
- It's not always necessary to start all over if you've messed up your design, often a little touch-up with a nailart brush can solve the problem.
- If you want to use a matte topcoat, use a regular one underneath. My experience with matte topcoats is that they smudge the design very easily, even when it's completely dry. Applying a normal topcoat first will prevent that.
- Moisterize your cuticles afterwards, because the tape can really dry out your skin!
- You can practice this tutorial on your old mani that you applied a day (or more) before. If you succeed, you've got yourself a fresh mani, otherwise you were going to remove it anyway!
- If you feel like this design is too time-consuming for a full mani, you can also use it for an accent nail (or two).
- Have fun and practice makes perfect ;)
I would absolutely love to see your attempt on my design, so feel free to leave a link to your creation in the comment section!
Polishes I used in this post are Pieces Ms Jagger Green and Color Club Where's The Soiree?.


0 comments:
Speak up your mind
Tell us what you're thinking... !